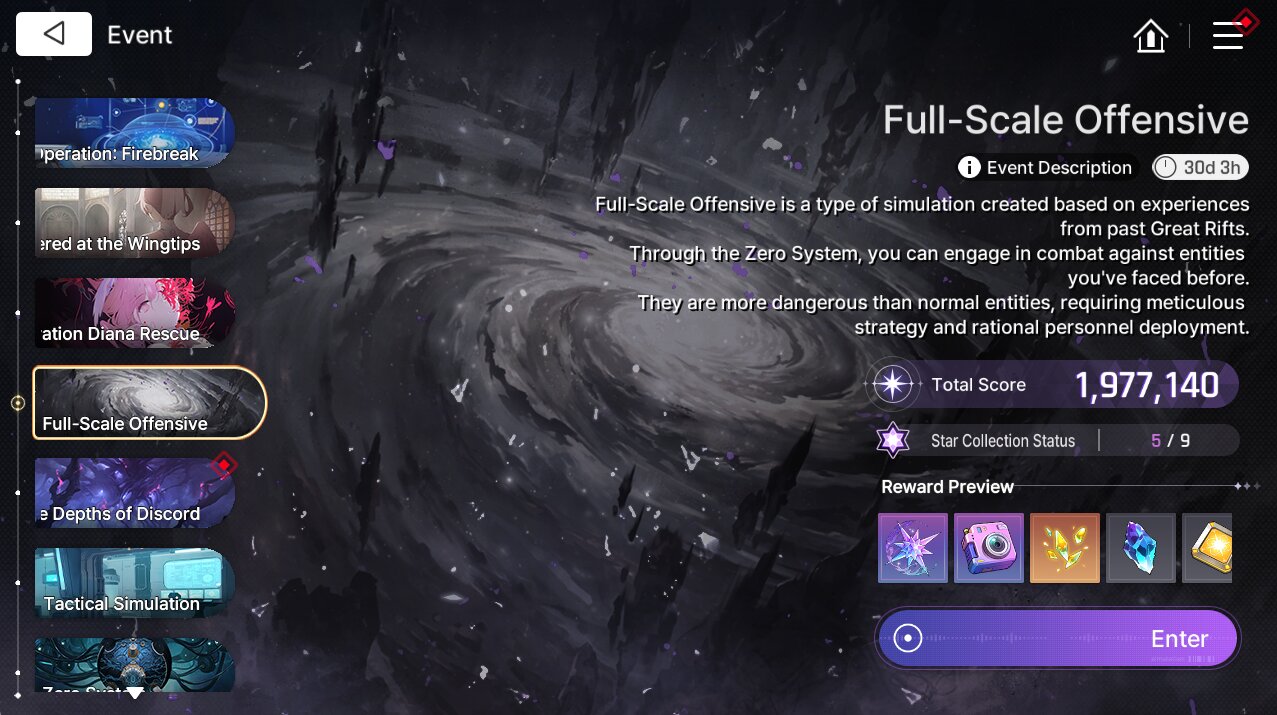
One of the endgame modes for Arknights: Endfield, the Umbral Monument Event is a special available event that challenges the different teams players can make and the different game mechanics they need to get used to. In this guide, we will go over all of the Umbral Monument Stages in Arknights: Endfield and show players how they can best clear them to get all of the rewards easily.
Make the best teams to challenge this endgame mode in Arknights: Endfield with the help of Enjoygm – the best top up site on the web!


Arknights: Endfield Umbral Monument Guide – Everything You Need To Know
What Is The Umbral Monument Gamemode
The Umbral Monument Gamemode is a special permanent Gamemode in Arknights: Endfield that periodically releases sets of challenges for players to fight, each with their own gimmicks and require players to challenge with different types of teams to best clear these challenges. Each set of challenges are generally released every update patch in the game, with each set containing 3 different challenge stages.

The challenge stages in Umbral Monument are divided into 2 different difficulties: Normal and Agony Mode. Normal Mode consists of enemies at level 30 and can easily be cleared after players have made a decently strong team. Agony Mode is the gamemode’s main challenge mode where players will need a fully lv90 built team that they are comfortable with playing in order to clear the highly difficult challenges and bosses with inflated stats.
Players can obtain all of the challenge’s rewards by simply clearing the normal mode for each Umbral Monument challenge, however, in order to obtain the coveted Trimmed medal, players will need to finish the challenges’ Agony modes.
Now that we have gone over how the Umbral Monument gamemode works, let us go over all of the different sets of challenges players will be able to face and advise players on how they can best clear each of these challenges:
Arknights: Endfield Umbral Monument Searing Scars – How To Clear
The first set of challenges for the Umbral Monument gamemode is the Searing Scar challenges, featuring 3 challenge stages:
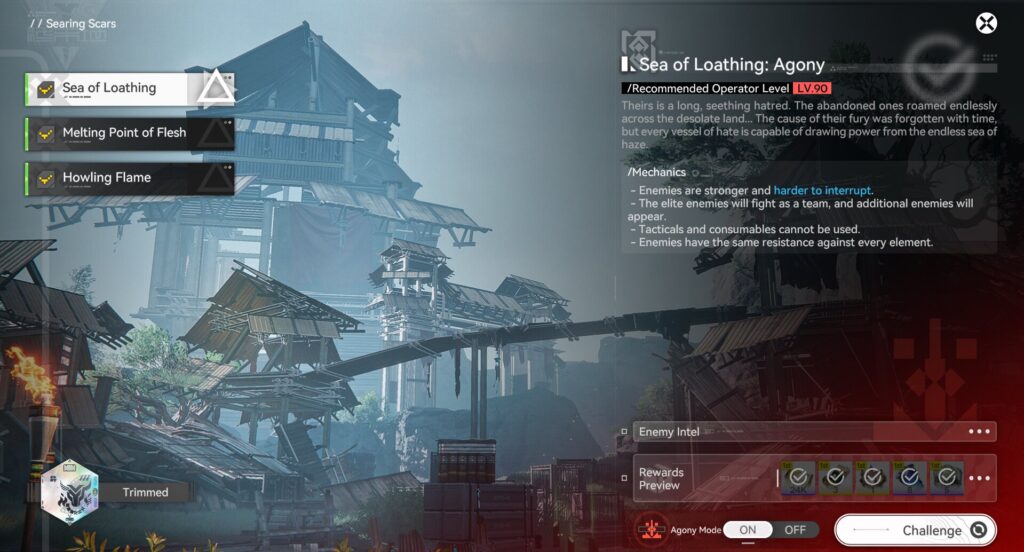
Sea Of Loathing
A special challenge against enemies that can resist all elemental damages and can chain the team to stun the team for a set amount of time.
Enemies:
– Breaking Gust: Nimble enemies that can hook operators and stun them if the hooks are connected successfully, required players to break the chains to break free.
– Cloud Stalker: Can spew Smoke onto the stage, any characters within the smoke will experience massive slow down and can’t dodge attacks. Can also spew green smokes that can heal enemies. Is relatively frail
Stage Gimmick:
– Enemies are stronger and are harder to interrupt.
– The elite enemies will fight in a team and additional enemies will appear.
– Tacticals and consumables cannot be used.
– Enemies have the same resistance against any element.
Clear Strategy:
– This stage is a test of the players’ ability to position themselves in a field filled with enemies and their ability to dodge enemies’ attacks.
– Focus on defeating the Cloud Stalker First while dodging hooks. Cloud Stalker enemies are extremely frail but are very annoying in this fight with their abilities to both hinder the characters’ movement and heal its allies, therefore, players need to make them the priority and take them out as soon as you can.
– Positioning and Dodging Is Key. Do not step onto the Cloud Stalker’s smoke as they will make it so that it is guaranteed that players will be hooked by the Breaking Gust enemies. Try not to engage against the enemies if you don’t have a clear sight of them. Nimble movements and dodging is the key to success in this stage.
– Use Any Teams. Since the enemies have the same resistances for all elements, use the team you are most comfortable with using or the best team you have built
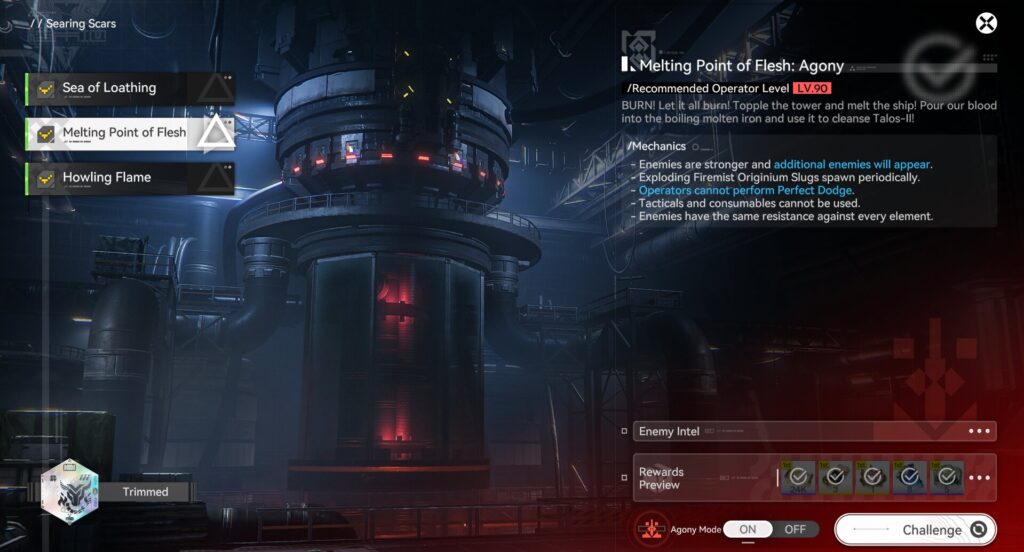
Melting Point Of Flesh
A special challenge that tests the players’ ability to navigate and avoid a burning field while being attacked by a constantly pursuing elite enemy.
Enemies:
– Bonekrusher Arsonist: An enemy armed with a flamethrower that constantly pursues and spews fires while leaving burning patches on the ground. Applying Physical Status or Solidification interrupts the enemy’s constant attack.
Stage Gimmick:
– Enemies are stronger and additional enemies will appear.
– Exploding Firemist Originium Slugs spawn periodically.
– Operators cannot perform Perfect Dodge.
– Tacticals and consumables cannot be used.
– Enemies have the same resistance against any element.
Clear Strategy:
– This stage mainly tests players ability to avoid burning patches while running around being chased by the enemies. Players can also interrupt the enemies’ attacks periodically in order to create opportunities to attack the enemies.
– Brute Force or Run: The main hindrance in this stage is the flame patches that the enemies and the Originium Slugs leave on the field, making operators take DoT damage whenever they step on these areas. Players can avoid these patches in order to minimize the amount of damage they take or if you are confident with your damage output, you can brute force this stage by constantly healing allies while still attacking the enemies.
– Use Physical Or Cryo Teams: Since the enemies in this stage can be interrupted easily when they are inflicted with Physical Statuses or Solidification, using a Physical or Cryo team is highly recommended in this stage in order to stop the enemies’ attacks and create opportunities for players to defeat them easier.
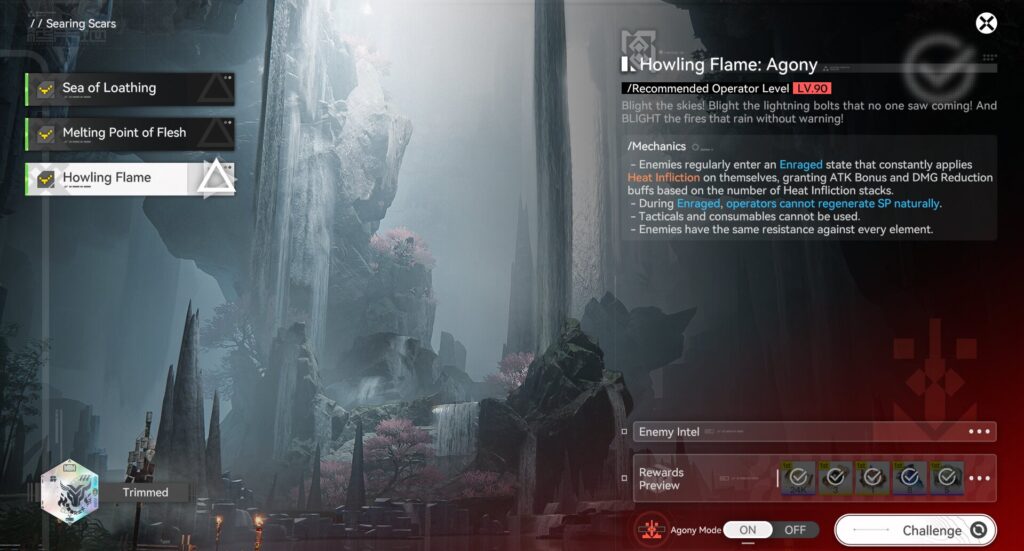
Howling Flame
A challenge that test the players’ ability to control the enemies’ infliction stacks in order to prevent them from dealing big damage to the entire team.
Enemies:
– Hill Smasher: A Boss enemy that constantly gains Heat Infliction on themself. Upon reaching certain stacks of Heat Inflictions, this enemy will be Enraged and deal even more damage in addition to being able to use enhanced skills. Inflict Cryo, Electric or Nature Inflictions will reduce the enemy’s Enraged duration.
Stage Gimmick:
– The enemies regularly enter an Enraged state that constantly applies Heat Infliction on themself, granting damage bonus and damage reduction effects based on Heat Infliction stacks.
– During Enraged, operators cannot regenerate SP naturally.
– Tacticals and consumables cannot be used.
– Enemies have the same resistance against any element.
Clear Strategy:
– This stage requires players to be able to manage the enemies’ Heat Inflictions stacks properly to reduce their damage bonus and damage reduction effects while also preventing them from using their powerful attacks.
– Do NOT Use Heat Teams: Any Heat teams or characters that can apply Heat Infliction stacks on the enemies should not be used as it not only helps the enemies to stack their Heat Infliction stacks easier but also help them to gain strengthen damage and reduce the damage they takes, making the fight even more challenging.
– Use Cryo, Electric or Nature Centric Teams: The bosses’ effects and abilities can be hindered whenever they are inflicted with Cryo, Electric or Nature Infliction stacks, therefore, players should bring these types of teams to challenge this stage.
– Bring At Least 1 Vanguard Operator: Since the team can’t naturally recover SP during the enemies’ Enraged state, players should bring a team that can easily recover SP through the help of a Vanguard Operator.
Arknights: Endfield Umbral Monument Inorganic Constructs – How To Clear
Bolts And Shadow
This stage challenges the players’ ability to dodge enemies’ projectiles and their ability to quickly deal with large groups of small enemies in order to remove the enemies’ damage immunity effects.
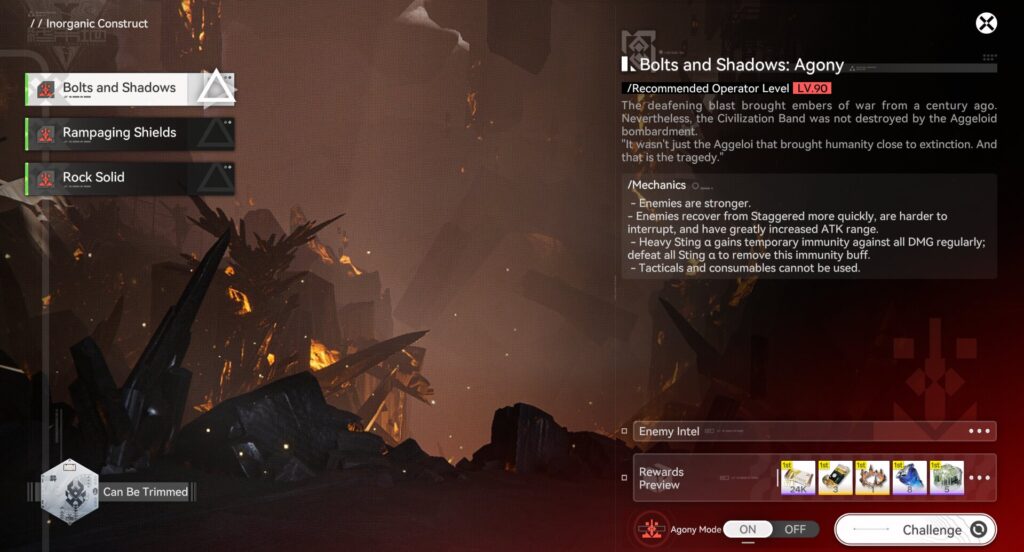
Enemies:
– Falsewings: Launches Small whirlwinds that can slow down operators.
– Sting a: Can shoot projectiles towards operators from afar.
– Heavy Sting: Can shoot multiple projectiles towards operators from afar and can occasionally summon spikes from the ground to deal damage to operators from afar. Gains periodical damage immunity effect that can only be dispelled by defeating a group of Sting a.
Stage Gimmick:
– Enemies are Stronger.
– Enemies recover from staggered more quickly, are harder to interrupt and have greatly enhanced attack range.
– Heavy Sting gains temporary damage immunity buff against all damages regularly, defeating all Sting a to remove this immunity buff.
– Tacticals and consumables cannot be used.
Clear Strategy:
– This stage is very annoying with players needing to avoid all of the small projectiles from all of the Sting while also avoiding the whirlwinds and the rock spikes on the ground, making it hard to position yourself properly.
– Deal As Much Damage As Possible: Clear Strategy:
The Damage immunity periods for the Heavy Sting are triggered at a set HP amount, typically at 70% and 40%. However, if players are able to burst down the enemy’s HP quickly enough, you can skip one of these triggers, allowing you to only have to deal with only 1 wave of enemies.
– Pay Attention To The Ground: The Heavy Sting and other Stings will constantly bombard you with projectiles and rock spikes, so players will need to pay attention and save your dodge opportunities to avoid crucial rock spikes.
– Deal With The Sting a As Quickly As Possible: The key to quickly win this fight is to group the Sting a enemies together as best as you can and defeat them as quickly as possible to disable the Damage Immunity effect.
Rampaging Shield
This stage challenges the players’ ability to parry the enemies’ attacks or avoid them while being charged at by a group of bull enemies.
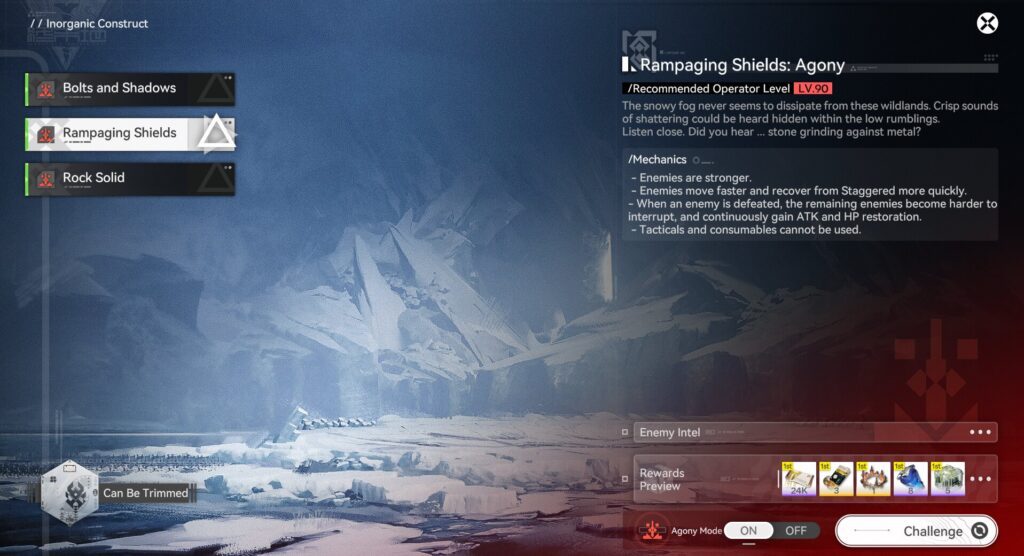
Enemies:
– Heavy Ram: Constantly charges forward towards the Operator, dealing damage to the operator. When a Heavy Ram is defeated, the remaining Heavy Rams enters frenzy mode, become harder to be interrupted and gains an attack increase in addition to a HP regen effect.
Stage Gimmick:
– Enemies are Stronger
– Enemies move faster and recover from Stagger much faster.
– When an enemy is defeated, the remaining enemies become harder to interrupt, gain more attack and gain a HP regen effect.
– Tacticals and consumables cannot be used.
Clear Strategy:
– This stage tests the players’ ability to parry the charging enemies’ attack in order to quickly raise their stagger gauge and create opportunities to deal big damage to them.
– Bring A Defender Operator: All of the Defender Operators in the game have the ability to parry the enemies’ attack and quickly raises the enemies’ Stagger bar when they are interrupted, making the perfect fit for this challenge stage.
– Jumping Is Also An Option: Some people might not know this, but the enemies’ attacks can easily be dodged if you jump in time, making the enemies miss their attacks entirely. While this doesn’t help to quickly raise their stagger bar unlike when you parry them, this is also a valid strategy if you want to brute force this stage without a Defender Operator.
Rock Solid
This stage tests the players ability to quickly burst down the enemy’s weakness in order to stagger them otherwise allowing the enemy to gain a massive attack buff.
Enemies:
– Walking Chrysopolis: Have a shield in front of it that makes it impervious to attacks from up front, and can only be attacked from exposed areas. Will periodically generate a weak point that needs to be defeated. If the weak point is defeated, the enemy will be staggered, otherwise, the enemy gains a massive attack buff.
Stage Gimmick:
– Operator Stamina Regen Rate Is Greatly Reduced.
– Enemies are stronger and are immune to Stagger.
– The Walking Chrysopolis recovers from weak point exposure more quickly. Failing to destroy the weak point will grant it a massive attack buff. Successfully destroying the weak point will apply Stagger to it.
– Tacticals and consumables cannot be used.
Clear Strategy:
– This Strategy is generally a damage check challenge, where players will need to quickly move and defeat the boss’ weak point as soon as possible to deal as much damage to the boss as possible.
– Positioning is Very Important: Since the boss has a protective shield in front of it and the stamina recovery rate of operators are reduced, it is very important that players conserve their stamina as much as possible to move efficiently behind the boss to deal damage to it.
– Burst Down The Weak Point: The boss’ weak point should be the players’ number one priority whenever it shows up and players need to bring the best team with the highest damage output to be able to quickly destroy the boss’ weak point as soon as possible.
Arknights: Endfield Umbral Monument Those Forsaken The Land – How To Clear
Survive The Gas
This stage tests the players’ ability to constantly heal and maintain the team’s HP while taking constant DoT damage and dodging enemies’ attacks.
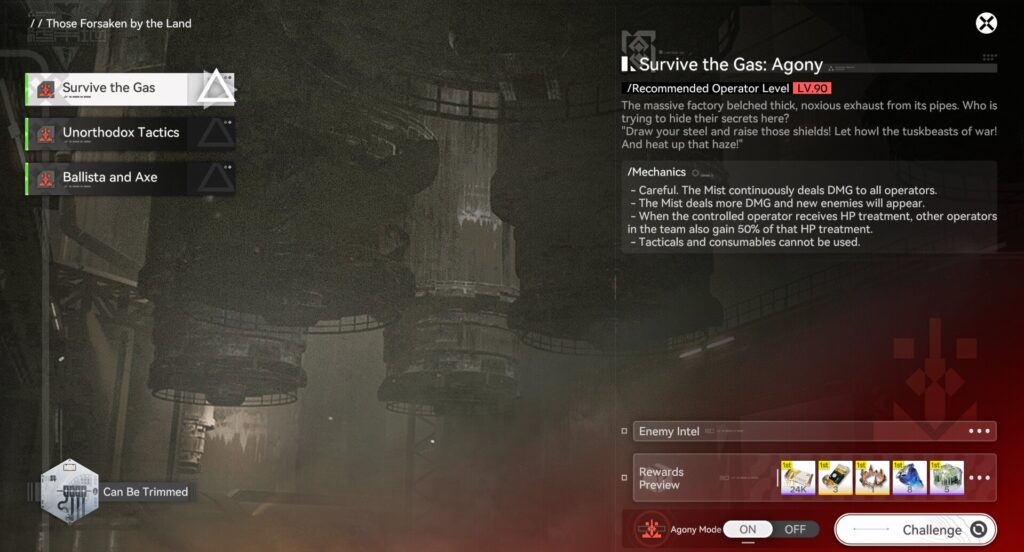
Enemies:
– Bonekrusher Ripptusk: An agile enemy that can quickly move through the battlefield.
– Hazefyre Tuskbeast: An agile and aggressive enemy that requires players to dodge its attacks to prevent its advances.
– Bonekrusher Vanguard: Will block attacks unless they are attacking, stagger them to shatter their shields.
– Bonekrusher Infiltrator: Agile enemies that can dodge basic attacks and throw daggers from afar. Dodge the daggers to counterattack.
– Bonekrusher Siegeknuckles: A boss enemy that will constantly pursue the team and deal damage to them.
Stage Gimmick:
– Careful. The Mist Continuously deals damage to all operators.
– The Mist deals more damage and more enemies will appear.
– When the controlled Operator gains HP treatment, other operators will gain 50% of that treatment.
– Tacticals and consumables cannot be used.
Clear Strategy:
– This stage challenges the players’ ability to dodge enemies’ attack and their healing capabilities to counteract the constant poison mist.
– Bring Strong Healers: Since the mist will constantly reduce the team’s HP, it is very important that players bring good healer operators in order to counter the mist’s damaging effect.
– Dodge Enemies’ Attacks: The majority of the enemies in this challenge will bombard you with attacks before making themselves vulnerable, so players need to dodge all of these attacks to counterattack and take these enemies out as quickly as possible.
Unorthodox Tactics
This challenge serves as a damage check that requires players to defeat the enemies as quickly as possible.
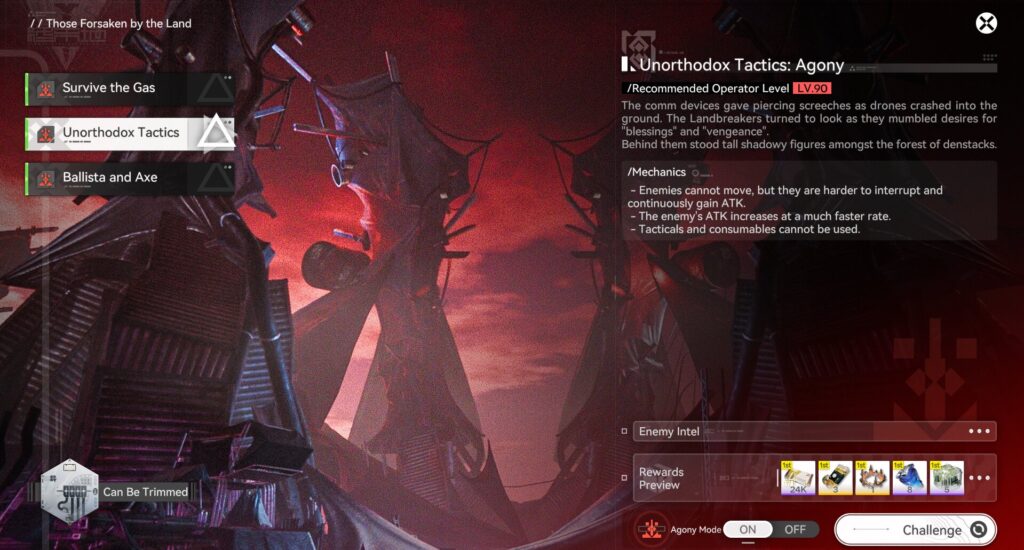
Enemies:
– Bonekrusher Ambusher: Can fire projectiles from a distance. Can’t move but gains attack stats the longer they are alive.
– Elite Ambusher: Can fire enhanced projectiles from a further distance. Can’t move but gains attack stats the longer they are alive.
– Tunneling Nidwyrm: Can continuously spit out poison onto the field that deals damage when stepped on.
Stage Gimmick:
– Enemies cannot move but will continuously gain an attack increase effect and are harder to interrupt.
– The enemies gain attack at a higher rate.
– Tacticals and consumables cannot be used.
Clear Strategy:
– This stage requires players to survive the enemies’ constant projectile bombardment to quickly approach the enemies and take them out as soon as possible.
– Burst The Enemies Down As Soon As Possible: As mentioned, the best way to deal with this stage is to quickly approach the enemies, control their attacks and burst them down as soon as possible before they gain a high amount of attack stats.
Balista and Axe
This challenge is a 3 stages boss fight that requires players to get used to the bosses movement and attack patterns to take them down effectively.
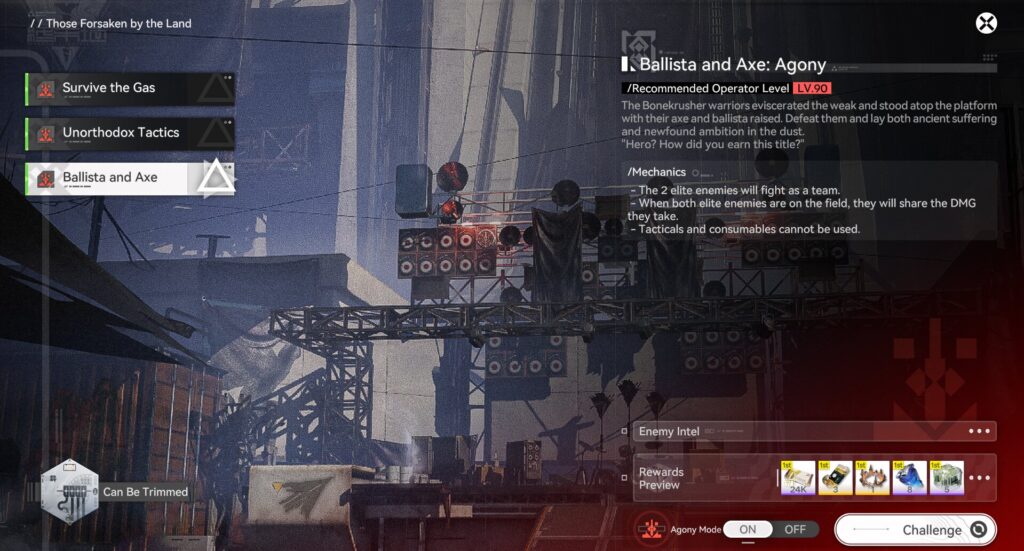
Enemies:
– Bonekrusher Executioner: Attack with an axe by quickly approaching the team. Shares damage with Bonekrusher Ballista when both are alive.
– Bonekrusher Ballista: Can fire projectiles towards allies and fire arrows from above to cover the field. Shares damage with Bonekrusher Ballista when both are alive.
Stage Gimmick:
– The 2 Elite Enemies fight as a team.
– When both Elite Enemies are on the field, they will share the damage they take.
– Tacticals and consumables cannot be used.
Clear Strategy:
– This stage is a 3 stage fight, with the first phase requiring you to take down the Bonekrusher Executioner, the second stage requiring you to take down the Bonekrusher Ballista and the 3rd phase requiring you to take down both at the same time.
– Burst Down The Bosses As Quickly As Possible: This challenge can easily be brute forced by players dealing as much damage to the boss enemies as quickly as possible.
Conclusion
With that, we have gone over the best strategies players can use to clear all of the challenges in the Umbral Monument gamemode in Arknights: Endfield. If you want to make the best teams to challenge these difficult stages, don’t hesitate to take advantage of special discounted deals for Arknights: Endfield Top Up at Enjoygm today!